Nobody want to store large video / audio files into their server hard disk or s3 buckets. So while uploading, they are all expecting to compress the video or audio files without losing originality, when we upload a video or an audio files in to their application. We do have functions & tag to manipulate image files in ColdFusion, but We don't have any ColdFusion build in option (tag / function) to manipulate audio / video files. You might heard of ffmpeg and it's wide usability. it is mostly in videos & audios sites such as YouTube/soundcloud or any other similar site. ffmpeg is very simple to learn. On ColdFusion, we can able to compress the video or audio files using FFmpeg utility. it is a free open source command line utility compatiable with all major operating systems (Windowns, Linunx & Mac). As We are going to demonstrate this process in Windows operating system, so we will be using FFmpeg .exe files. ColdFusion has the facility to run the executable ( .exe, .bin, .bat, .sh ) files using cfexecute tag. Other than, video compression, ffmpeg can be used to know the duration of the movie/audio in seconds to retrieving the bitrate of the movie/audio file. This can be very helpful when you are developing application that has to do with uploading videos because you can know a lot of information about it.

Here, We will explain, how to do the video compression process in ColdFusion using FFmpeg. Using FFmpeg, we can able to compress the video without losing quality and can able to get the informations about video or audio files.
FFmpeg is the leading free open source multimedia command line utility. Using this utility, we can able to do the following things,
FFmpeg can run in Linux, Mac OS X, Microsoft Windows, the BSDs, Solaris, etc. operating systems. There are three types of tools coming on FFmpeg bundle,
We can able to compress video or audio files and then will stored into particular folder using ffmpeg tool. And using ffprobe tool, can able to get the video or audio file's meta information.
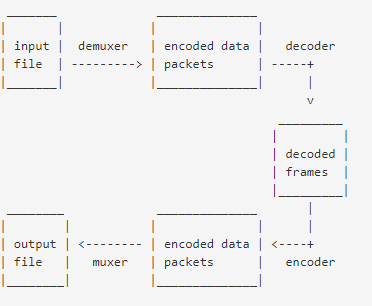
ffmpeg binary files based upon your OS. They are providing binaries for multiple OS such as Linux, Mac & Windows. .exe extension files on ffmpeg\bin path. These are the core files. Using these files, we can able to do the video compression and some other operations on video/audio files. ffmpeg is a very fast converter used to compress the offline & live video and audio files. The below diagram will explain the ffmpeg transcoding process.

Video Compression Command Line : ffmpeg -i [input file] -vcodec libx264 -crf 20 [output file] ColdFusion has a facility to run the .exe extension files using cfexecute tag. While using this tag, we need to pass the necessary parameters to run .exe file. Please see the below code snippet.
ffprobe utility is mainly used to get meta information about multimedia streams ( video & audio ) and prints it in human readable format. You can able to get all kinds of information about an input including duration, frame rate, frame size, etc.
Command Line : ffprobe [OPTIONS] [INPUT_FILE] ffprobe has two parameters,
| Parameters | Description |
|---|---|
-show_format | This parameter is used to display all information about input video or audio file such as video width, height, display_aspect_ratio, duration, filename, size, bit_rate and etc... |
-show_entries | This parameter is mainly used to get particular information about video or audio. For example, if we need only video duration means, need to use below syntax. Command Line : ffprobe -i [input file] -show_entries format=duration -v quiet -of csv="p=0" -sexagesimal [output file] |
-show_format parameter In the above code, I have passed the needed parameters to the ffprobe.exe file. In the arguments passed, I have used -print_format json, this is used to print the output in the JSON format. After running this code, you can able to see the below output in the mentioned output file.
-show_entries parameterIn this example, will see how to get the input file Duration only.
Video time duration - 0:00:30.024000